How To Install Sai Brushes
The easiest way to install new brushes and textures in SAI is to understand how it works. I've personally found that tutorials or step-by-step guides are more confusing rather than helpful. My approach is to explain how SAI works instead. Don't worry, it's not complicated!
HOW TO FIND WHERE PAINTTOOL SAI IS INSTALLED ON YOUR COMPUTER
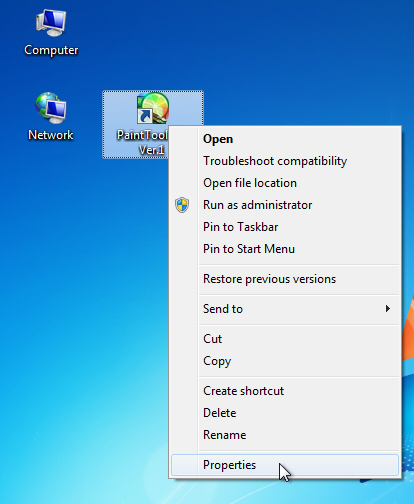
Locate the PaintTool SAI icon with which you launch it on your computer. It can be located on your Start Menu, or your desktop. Right click on the icon and you'll get a menu like this. Click on Properties.

A window will appear. Click on theOpen File Location button.

A new window will appear. This is where your SAI is installed with all its system files. Not that difficult, huh?

THE SAI FOLDERS
The only folders that interest us are blotmap, brushtex, elemap and papertex. If you open any of these folders you'll see they contain BMP files, which are image files just like JPGs or GIFs.
blotmap and elemap contain the brushes shapes ("maps"). There are two types of maps which behave differently, which is why they are kept in two separate folders. They are the ones you choose here, on the brush panel:

brushtex contains brushes textures. A brush can have a certain shapeand it can have a texture. For example, a simple circle brush shape can have a "dirt" texture. They are the ones you choose here, right below the brush shape:

papertex contains paper textures. Unrelated to brushes textures, these are textures you apply on a layer. On SAI they can be chosen on the Layers panel:

THE SAI CONF FILES
We are only interested on these configuration files: brushform.conf, brushtex.conf and papertex.conf. What are these files? They are lists of the things we described above. SAI handles three things: brush shapes, brush textures and paper textures, remember? Well, these three files are the master lists of those.
brushform.conf – Like its name says, this file contains the list of brushes forms (i.e. shapes or maps).
brushtex.conf – This file contains the list of brushes textures.
papertex.conf – Pretty straightforward, right? This one has the paper textures.
HOW TO EDIT A SAI CONF FILE
Double-click on a conf file to edit. Notepad should open with the file contents.
If that doesn't work then right-click on the conf file you wish to edit. A menu will open. Try these methods, in order, until one works on your computer:
- If there's an "Edit" menu item, click it. Notepad should open with the file contents.
- If there's an "Open with…" menu item, click on it. If a submenu opens, choose "Notepad" from that submenu's items.
- If there's an "Open with…" menu item, but a new window appears instead, choose "Notepad" from the list of programs.
Sorry if I didn't provide screenshots at this point.
Now you should have a conf file open, which looks like this:

Each line describes an item on SAI's lists and refers to an image file located in the folders. Each line must follow this format:
number,path to the BMP image file
For example, the first line in my brushform.conf is:
1,blotmap/Noise.bmp
Where blotmap is the folder and Noise.bmp is the BMP image file we're referring to.
Now, about that number, it follows this simple rules:
- For brushtex.conf and papertex.conf, the number is always 1. No worries there.
- For brushform.conf, the number is 1 for blotmaps and 2 for elemaps. Remember we wrote before there were two type of brush maps?
So, finally…
HOW TO INSTALL NEW BRUSHES AND TEXTURES
Up to this point I assume you've understood all previous explanations. Installing is quite simple:
- Go to the folder where SAI is installed.
- Copy or uncompress the new brush or texture image files on the folders specified by the brush or texture author (i.e. elemap, blotmap, brushtex or papertex).
- Edit the corresponding conf file or files.
- Restart SAI (quit and open it again).
Usually you'll download a brush or texture from a source and the author will try to explain how to install them. And usually the part where everything gets confusing is in editing the conf files. If the author provides a conf file,always remember you should never overwrite yours with it. You're expected to append its contents to your own conf file.
CONF GUIDELINES FOR BRUSHES:
Each BMP file should now be added as a new line onbrushform.conf in the format we described previously:
number,path to BMP image
For Brushes, there can be two types: a blotmap or an elemap.
- If the file is ablotmap, put a number 1.
- If the file is aelemap, put a number 2.
If you weren't told what type it is, open the BMP file and compare:

So, for example, I downloaded a Coconut brush and I was instructed to save it on blotmap. The line I should add to brushform.conf is:
1,blotmap/Coconut.bmp
Example 2, if I downloaded a Fly brush and it's an elemap, the line I should add to my brushform.conf is:
2,elemap/Fly.bmp
You can add this line anywhere you want in the list. I usually move a brush to the top when I use it frequently and becomes a favorite.
CONF GUIDELINES FOR TEXTURES
For brush textures, copy or uncompress the files on the brushtex folder. For paper textures, put the image files on the papertex folder. Then add new lines for each new image on brushtex.conf for brush textures or papertex.conf for paper textures. Examples:
1,brushtex/Noise 3.bmp
1,papertex/Gritty.bmp
To be continued…
How To Install Sai Brushes
Source: https://painttoolsaibrushes.splstc.com/understanding-brushes-textures-painttool-sai/
Posted by: fauntleroysularoat68.blogspot.com

0 Response to "How To Install Sai Brushes"
Post a Comment